Docker Networking
Docker Networking
- none - no networking
- host - host networking
- bridge - default networking
- overlay - multi-host networking
- macvlan - assign a MAC address to a container
- ipvlan - assign an IP address to a container
Today we'll focus on the first four.
Commands:
docker network create <network>- Create a network- Use
-d, --driverto specify the driver, default isbridge, other option isoverlay
- Use
docker network rm <network>- Remove a networkdocker network ls- List networksdocker network inspect <network>- Inspect a networkdocker network connect <network> <container>- Connect a container to a network- e.g.
docker network connect bridge my_container docker run --network=<network> ...- Connect a container to a specific network when it starts
- e.g.
docker network disconnect <network> <container>- Disconnect a container from a network- e.g.
docker network disconnect bridge my_container
- e.g.
None
The none network disables all networking for the container, including port forwarding.
Host
The host network removes the network isolation between the Docker container and the Docker host. When a container uses the host network, it shares the host's network stack, which can improve performance by eliminating network overhead. For instance, if the container listens on port 80, it is listening on the host's port 80.
However, it also means that the container can listen on all network interfaces on the host, which might not be desirable from a security perspective.
Bridge
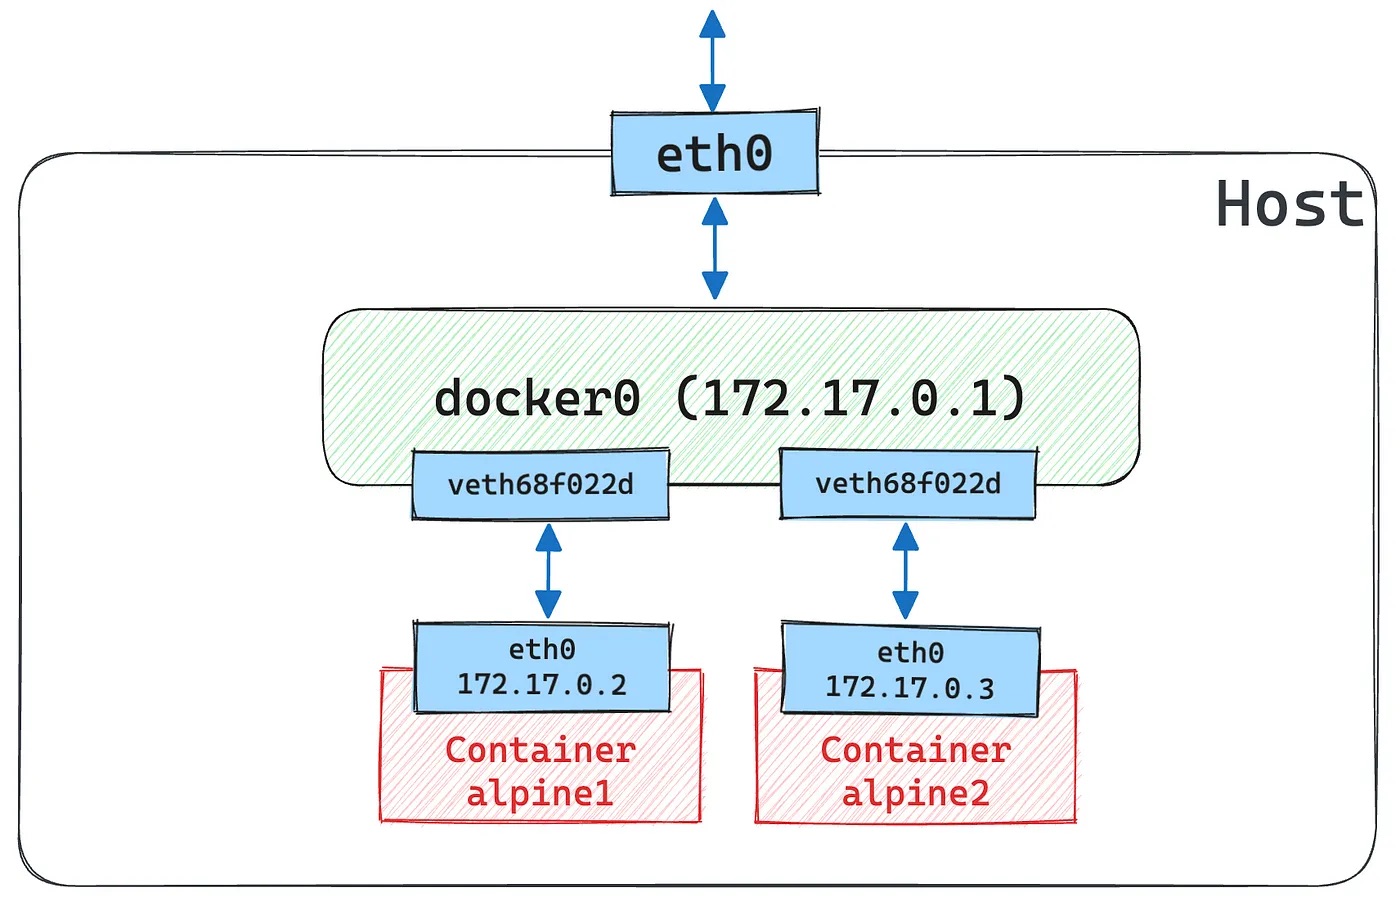
The bridge network is the default network when you create a new container. It creates a private internal network on the host, and the containers can communicate with each other using their IP addresses.
For example,
docker run -dit --name alpine1 --network bridge alpine ash
docker run -dit --name alpine2 --network bridge alpine ash
the two containers can communicate with each other using their IP addresses because they are on the same bridge network named bridge.

Source: Medium: Docker Container 基礎入門篇 2
In the host machine, you can see the bridge network was called docker0 by running ip addr.

Custom Bridge Network
To create a custom bridge network, you can use the following command:
docker network create my-net
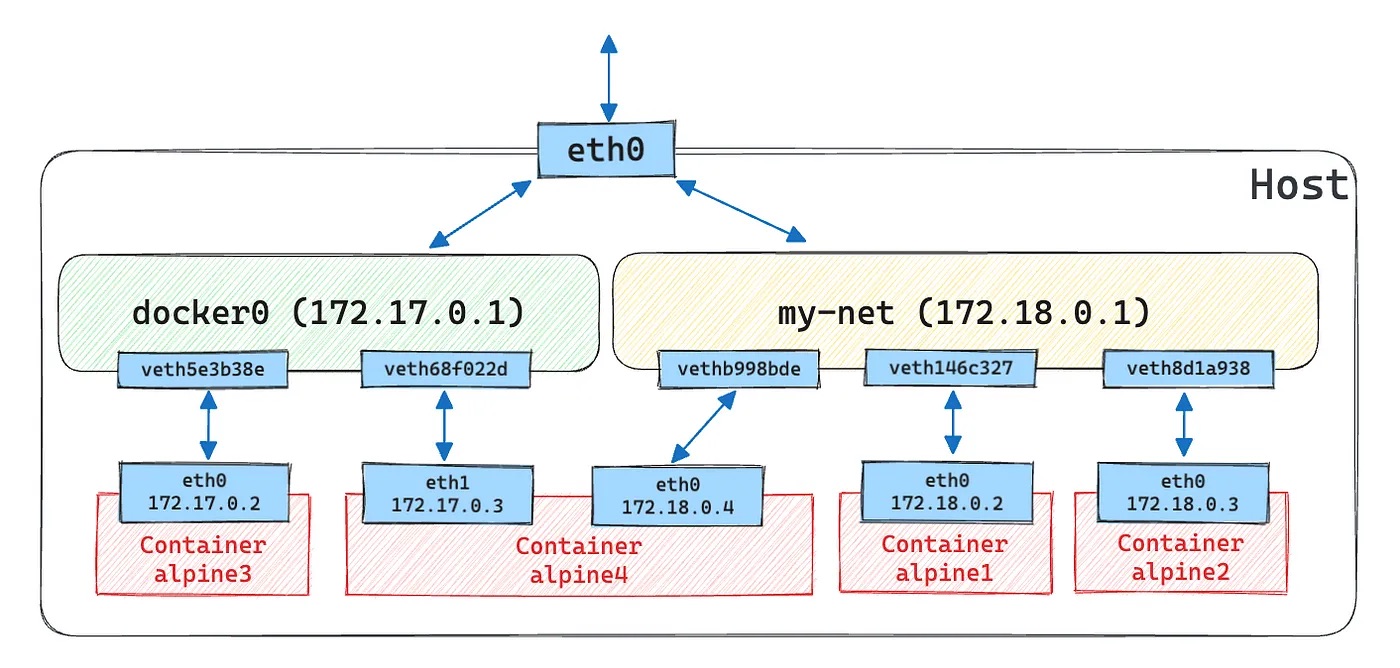
The new network my-net will be created with the bridge driver and can be used to connect containers.
Now, stop alpine1 and alpine2 and connect them to the new network my-net.
# Stop both containers
docker stop alpine1 alpine2
docker rm alpine1 alpine2

# Start the containers with the new network
docker run -dit --name alpine1 --network my-net alpine ash
docker run -dit --name alpine2 --network my-net alpine ash
Then, create alpine3 and alpine4 and connect them to the new network my-net.
# Connect alpine3 to default bridge
docker container run -dit --name alpine3 alpine ash

# Connect alpine4 to both my-net
docker container run -dit --network my-net --name alpine4 alpine ash
# Connect alpine4 to bridge
docker network connect bridge alpine4
So, currently,
alpine1andalpine2are connected tomy-netalpine3is connected to the defaultbridgenetworkalpine4is connected to bothmy-netandbridge

Source: Medium: Docker Container 基礎入門篇 2
Furthermore, we can now communicate between containers in the same network using their container names. For example, that's ping from alpine1 to alpine2 for 5 times. (This is not possible on default bridge network.)
# Attach to alpine1
docker attach alpine1
/ # ping -c 5 alpine2
PING alpine2 (172.18.0.3): 56 data bytes
64 bytes from 172.18.0.3: seq=0 ttl=64 time=0.117 ms
64 bytes from 172.18.0.3: seq=1 ttl=64 time=0.064 ms
64 bytes from 172.18.0.3: seq=2 ttl=64 time=0.108 ms
64 bytes from 172.18.0.3: seq=3 ttl=64 time=0.108 ms
64 bytes from 172.18.0.3: seq=4 ttl=64 time=0.109 ms

--- alpine2 ping statistics ---
5 packets transmitted, 5 packets received, 0% packet loss
round-trip min/avg/max = 0.064/0.101/0.117 ms
After attaching a container, you can detach by pressing
Ctrl + P, Ctrl + Qwithout stopping the container.
Container
Containers can also be connected to other by using --network container:<container_name>. First, stop and remove all existing containers. Then, connect alpine1 to alpine2.
docker run -dit --name alpine1 --network bridge alpine ash
docker run -dit --name alpine2 --network container:alpine1 alpine ash
This will connect alpine2 to the same network as alpine1.
Overlay
The overlay network is used for Docker Swarm or multi-host networking. It allows containers to communicate with each other across multiple Docker hosts.
https://ithelp.ithome.com.tw/articles/10193708
1. Initialize Docker Swarm
Let's create a new overlay network via Docker Swarm. First, initialize a Swarm.
docker swarm init --advertise-addr <ip_address>
The output will show a join token for other nodes to join the Swarm.
ip_address: The IP address of the host machine
2. Join Worker Nodes to Swarm
Then, create a new overlay network.
docker swarm join --token <token> <ip_address>:<port>
token: The join token from the
docker swarm initcommand
ip_address: The IP address of the host machine
port: The port number for the Docker Swarm, it's either2377,7946or4789. For further details, check the official documentation
Once the nodes are connected, check the status by running docker node ls.
3. Create Overlay Network
docker network create -d overlay my-overlay
-d overlay: Specify the driver asoverlay
my-overlay: The name of the overlay network
4. Deploy Services
docker service create --name web --network my-overlay -p 8080:80 nginx
docker service create --name db --network my-overlay mysql
The nginx container will be accessible on port 8080, and it will use the overlay network my-overlay. The mysql container will also use the same overlay network.
5. Inspect and Testing
docker network inspect my-overlay
This will show the network details, including the nodes and services connected to the network.
docker exec -it <container_id> ping web
docker exec -it <container_id> ping db
The ping command should now work between the containers.